Showing posts with label baking. Show all posts

Wednesday, April 24, 2013

Peanut Butter Banana Ice Cream Pizzelle Sandwiches


This is the perfect summer treat. Peanut butter banana ice cream served in pizzelle tacos or cups. Although this treat is a little equipment heavy, it is so worth it.

Pizzelles are a light Italian cookie. I’ve tried a vegan and a non vegan recipe. My recommendation is to first try the Stonewall Kitchen mix. I’m not a big fan of mixes, but this will help ease you into Pizzelle making. The next batch try this non vegan recipe. If you’re feeling a little brave, move on to the vegan recipe. Traditional pizzelle batter is thicker, but this vegan recipe is thin, so the cookies will not be as sturdy.


To bake pizzelles, preheat iron for about 10 minutes. Place one spoonful of pizzelle batter in center of iron. Close iron all the way down, until steam comes up and release. Allow to bake for 30 seconds.

Carefully transfer baked pizzelle with fork. To shape, either place around cannoli roller or place in small bowl. Allow to set until hardened.


The ice cream portion requires a Yonanas, but I read someone had success using a blender. The first time I made Yonanas the cream was a little bitter, but this time I perfected the technique. Make sure you freeze really ripe bananas, like black ripe. Just continue to add peeled bananas in your freezer, until you have enough to make a batch.


Once you are ready to make the ice cream, set bananas out for 10 minutes. Then pulse them through the machine. Once all bananas are transformed into ice cream, stir in peanut butter. Place ice cream in pizzelle tacos/cups and garnish with chocolate chips and strawberries. These are super light, but they remind me of Ben & Jerry's decadent Banana Peanut Butter Greek Frozen Yogurt.


Peanut Butter Banana Ice Cream

Ingredients

  • 5 very ripe peeled frozen bananas
  • 2 tbsp creamy peanut butter, or to taste

  • Chocolate Chips
  • Sliced Strawberries

Instructions

Place bananas in Yonanas. Once all bananas are churned, mix in peanut butter.

Spoon in pizzelle tacos/cups and garnish with chocolate chips/strawberries.

Monday, April 22, 2013

Lemon Blueberry Muffins


Lemon blueberry muffins are the perfect treat. They are sweet and indulgent, but they also feel a little healthier with fresh blueberries.


These muffins have one of my favorite ingredients, coconut milk. This gives the muffins a moist and creamy texture.


This recipe makes more than your normal batch of muffins because I didn't want any leftover coconut milk. If you want to make a dozen muffins, this recipe can easily be divided.


Lemon Blueberry Muffins Adapted from Chloe's Vegan Desserts

Makes about 26 muffins

Ingredients

  • 4 cups all purpose flour
  • 1   1/2 cups sugar
  • 2 tsp baking powder
  • 1 tsp baking soda
  • 1 tsp salt

  • 1    16 oz can coconut milk
  • 1 cup canola oil
  • 1/2 cup lemon juice
  • Zest of 2 lemons
  • 2 tbsp lemon extract

  • 2 cups of blueberries (about 2 pints)

Instructions

Preheat oven to 400 degrees. Line muffin tin with paper wrappers.

In a large bowl, combine all dry ingredients from top column - flour, sugar, baking powder, baking soda and salt.

In a medium bowl, combine all liquid ingredients from second column - coconut milk, oil, lemon juice, zest and extract.

Pour liquid ingredients into dry and whisk until combined. Fold in blueberries.

Divide batter evenly among muffin tin. 

Bake for 20 minutes or until a toothpick inserted in the center comes out clean.

Wednesday, April 17, 2013

Basil Tofu Pizza


My family has been making this pizza for several years. I think it all started when I found a pizza dough recipe. I don't know where I found the recipe, but I have it saved on my handy dandy TextEdit filed titled "Online Recipe Winners." I created this back on August 18, 2009. The recipe is attributed to Joy of Cooking. I'm afraid I don't know who the original blogger was that posted it, but it's a super simple dough recipe that can be ready in about an hour and a half.


We make this sans cheese, with Isa Moskowitz's Basil-Tofu Ricotta. The first time I made this, I really thought it tasted like cheese.

What's great is for my family, it makes enough for two meals. One pizza yields about 6 large slices.


I use a preheated pizza stone to make pizza, but I'm sure you could sub a regular baking sheet.


What kind of toppings do you like on your pizza?

Basil Tofu Pizza Adapted from Joy of Cooking and Vegan with a Vengeance

Makes 2 pizzas

Ingredients

Pizza Dough

  • 2   1/4 tsp instant yeast
  • 1   1/3 cup warm water

  • 3   1/2 cups all purpose flour
  • 1 tbsp salt
  • 2 tbsp olive oil

Basil Tofu

  • 1 pound pressed firm tofu 

  • Juice of one lemon
  • 1 clove of grated garlic
  • 1/4 tsp salt
  • 1 tbsp dried basil leaves, or to taste
  • 1/4 cup nutritional yeast

  • 2 tsp olive oil

Assembly

  • 1 jar of tomato sauce - try your favorite pasta sauce

Instructions

Pizza Dough

Combine yeast and warm water in large bowl. Let sit for five minutes.

Add flour, salt and oil. Stir to combine. Knead for five minutes.

Place dough in floured bowl and allow to rise for one hour.

Basil Tofu


Mush pressed tofu with your hand until it resembles fine crumbles. Add in ingredients from second column (lemon juice, garlic, salt, basil leaves, nutritional yeast) with your hands. Once combined, drizzle in olive oil and stir to coat.

Assembly

Preheat oven to 450 degrees 30 minutes before baking time. Place pizza stone in oven. 

Divide risen dough in half. Roll into circle on a floured surface. Once desired size, transfer dough to preheated pizza stone. Top with half of one jar of pizza sauce. Top with half of basil tofu.

Bake 10 minutes or until crust is golden brown.


Note: If making extra pizza next day, place dough in refrigerator. Pull out of fridge two hours before making pizza.

Monday, April 15, 2013

Strawberry Hand Pies


My mom has been inspiring lots of different recipe ideas. She even came up with a new blog name, more on that later . . . maybe. While she was at the store, she got me some fresh berries to bake with. I toyed with lots of different ideas - pies, cupcakes, cakes, muffins - the list goes on and on. I settled on a hand pie - everything you love in a pie, in a portable form.


These are pretty simple. First whip up the strawberry filling. Once done, place in the freezer, just so berries are more stable during prepping and baking.


While the strawberries are chilling, make the pie dough. Don't be scared of this dough. All you need are your hands and patience. Once the flour and butter/shortening combine into small pellets, add ice cold water and vinegar mixture and mix until a workable dough forms. The dough is now ready to be rolled and shaped with no need for additional chilling.


I initially decided on a half moon design for pies, but then switched to mini circular pies - my mom's idea :)


Once pies are assembled, bake until golden brown. These sweet treats are great straight from the oven or at room temperature.


Strawberry Hand Pies Adapted from Vegan Pie in the Sky

Makes 12 pies

Ingredients

Strawberry Filling
  • 1 pound fresh strawberries
  • 1/3 cup sugar
  • 2 tbsp cornstarch
  • 1 tsp vanilla
  • Juice of one lemon

Pie Dough

  • 2   1/2 cups all purpose flour
  • 1/2 tsp salt

  • 3 tbsp sugar

  • 1/2 cup Earth Balance buttery stick, cold
  • 1/2 cup Earth Balance shortening, cold

  • 6 tbsp ice cold water
  • 1 tbsp apple cider vinegar


Instructions

Strawberry Filling

Combine all ingredients (strawberries, sugar, cornstarch, vanilla and lemon juice) in small bowl. Place in freezer while preparing pie dough.

Pie Dough

Fill measuring cup with 2 cups of ice and fill with water. Set aside.

Combine flour and salt in large bowl. Add sugar and combine. Cut butter and shortening into tablespoons and place in bowl with flour. Use your fingers to combine butter/shortening with flour, it should take 3 - 5 minutes. Butter/shortening and flour are combined when the two resemble small pellets and no large chunks of butter remain. When you press the mixture in your hand it should hold together.

Pour 4 tablespoons of ice cold water in small bowl. Add apple cider vinegar. Pour mixture by tablespoons into flour mixture. Mix with hands after each addition. Once dough holds together it is ready. Add extra cold water if dough does not hold.

Split dough in two. While rolling first piece of dough, place other half in refrigerator.

Assembly

Preheat oven to 400 degrees.

Roll dough on floured surface. Cut out 3" diameter circles. With one circle, use your fingers to moisten edge of dough. Put about one tablespoon of fruit filling in center. Top with other dough circle, closing the two circles with moistened fingers. To ensure two circles combine, press edges with fork. Cut slits in top of pie.

Bake for 20 minutes or until golden brown.

Wednesday, April 10, 2013

Crusty Italian Bread

If you've been following the blog from its inception, you will know I love making bread. So far I've shared a Cinnamon Raisin Bread, a Maple Whole Wheat Bread and a French Bread. This past Christmas I got an Italian Loaf Pan. I really wasn't sure how to use it. The directions said use a solid, sturdy dough. The dough from the French Bread is really sticky so I didn't think it would be a good tester loaf. So I started exploring and I found this great recipe from Cook Like Your Grandmother. It wasn't easy to find either, it was tucked away on the 10th page of Google results.


This bread is a little time intensive, but I've found if you decrease the rising times it still works out beautifully. I would recommend rising 1 hour for the first rise, 20 minutes for the second rise. This is a serious reduction of the original rising time. If you have the time, do the full 2 hours and 40 minutes of rising, but if you don't, don't be afraid to decrease the time.


After the first rise, take the entire ball of dough and roll it into a long loaf then cut it in half with a dough cutter and line on your Italian Loaf Pan. According to the original recipe, you can also bake the loaves on a pizza stone or on the back of a baking sheet, so don't worry if you don't have an Italian loaf pan, although it helps make a crusty bread.


The bread goes great with anything. Traditionally we have it with spaghetti on nights before long runs, but we've also had it with pasta and peas and most recently as a sandwich with Field Roast Smoked Apple Sage Sausages sauteed with peppers and onions. It's also great paired with a soup.


For more detailed instructions, check out Cook Like Your Grandmother's post. The author, Drew Kime, provides step-by-step instructions. 

Crusty Italian Bread Adapted from Cook Like Your Grandmother

Ingredients

  • 2     1/4 tsp instant yeast
  • 1/4 cup warm water   

  • 1 cup warm water

  • 3 cups all purpose flour
  • 2 tsp sugar
  • 1 tsp salt

  •  1 tbsp olive oil

Instructions

Combine yeast and 1/4 cup warm water in small bowl. Let sit 3 minutes or until small bubbles form and yeast dissolves.

Pour 1 cup warm water in large bowl. Add dissolved yeast. Combine.

Add flour, sugar and salt. Mix until combined.

Once combined, add olive oil.

Knead for five minutes. Transfer dough to oiled bowl. Let rise one hour.

Preheat oven to 425 degrees.

Roll dough in long loaf. Cut in half. Place on Italian loaf pan. Let rise 20 minutes.

Bake for 10 minutes. Reduce oven to 400 degrees. Bake an additional 15 minutes. Cover loaves with aluminum foil. Continue to bake an additional 10 minutes.


Monday, April 8, 2013

Lemon Frosted Coconut Carrot Cupcakes

As promised, here are the cupcakes my family had to celebrate Easter.


I had requests for coconut, lemon and carrot. I was worried about picking one flavor and ignoring the other flavor suggestions.


So after brainstorming ideas, it came to me. A carrot cupcake loaded with coconut and topped with a light lemon frosting with an extra sprinkle of coconut. 


The cupcakes were super moist and the frosting was the perfect addition. You can also make this in cake form with or without frosting.


Lemon Frosted Coconut Carrot Cupcakes Adapted from The New Me and Isa Chandra Moskowitz

Makes 16 cupcakes or one 9 x 9" square pan

Ingredients

Cake

  • 2 cups all purpose flour
  • 1 cup sugar
  • 1/3 cup brown sugar
  • 1/2 tsp salt
  • 1/2 tsp baking soda
  • 2 tsp baking powder
  • 2 tsp cinnamon 

  • 3 cups shredded carrots

  • 3/4 cup canola oil

  • 1/2 cup orange juice

  • 1    1/2 cups shredded coconut

Instructions

Preheat oven to 350 degrees. 

Combine dry ingredients from first column. Stir in carrots. Pour in canola oil and mix. Batter will be thick. Pour in orange juice. Batter will slowly thin a bit. Fold in shredded coconut.

Grease muffin tin or 9 x 9" square pan. Pour batter into greased dish. If making cupcakes, bake 25 minutes or until a toothpick comes out clean. If making cake, bake for 45 - 50 minutes, until a toothpick inserted in the center comes out clean.

Frosting

Ingredients

  • 1/4 cup Earth Balance Shortening
  • 1/4 cup Earth Balance Buttery Stick

  • 2 cups powdered sugar
  • Juice of 2 lemons

  • Zest of 2 lemons

Instructions

Blend shortening and butter until combined with hand mixer. Add powdered sugar in 1/2 cup increments alternating with lemon juice. Beat three minutes or until fluffy. Fold in lemon zest.

Frost cupcakes with frosting and sprinkle with coconut.

Thursday, April 4, 2013

Sugar Coated Cinnamon Raisin Swirl Bread


I'm longing for road trips. Trips to DC, the North Carolina mountains, the coast, somewhere. With the bright sun on the dashboard and either the quiet companionship of a good book or some cheerful tunes.

Perhaps my favorite things about road trips though are lunch breaks, with a good peanut butter sandwich, apple slices and water.


Some of my fondest memories of trips involve pit stops either at awkward middle of nowhere fast food places or rest stops. I can't forget the time my family inadvertently tried to get on Quantico Marine Corps base three different times - we were just looking for a gas station! There's also the time we met a cat coming home from the Outer Banks. We astutely named her Plymouth after the town the rest stop was in.

So back to the peanut butter sandwiches. What could be better than to have them on cinnamon raisin bread? If you're going on vacay, and don't want to have to eat out every day or go to a grocery store, baking a loaf of the bread the day before will at least help for the lunches.


This loaf is gorgeous with its cinnamon swirl, specks of raisins and sugar coated topping. 


Sugar Coated Cinnamon Raisin Swirl Bread Adapted from Peter Reinhart (Check out all his fabulous books here)

Ingredients

  • 1   3/4 cups bread flour (recommended KAF)
  • 2 tsp sugar
  • 5/8 tsp salt
  • 1 tsp instant yeast
  • 5/8 tsp cinnamon

  • 1/4 cup applesauce
  • 1 tbsp Earth Balance shortening
  • 1/4 cup almond milk
  • 3/8 cup water 

  • 3/4 cup raisins

Cinnamon Swirl/Topping

  • 1/2 cup sugar
  • 2 tbsp cinnamon  

For greasing loaf


Instructions

In a large bowl, combine ingredients from first column - flour, sugar, salt, yeast and cinnamon. 

Once combined, add applesauce, shortening, almond milk and water

Knead dough for 10 minutes. In the last 2 minutes, incorporate raisins.

Transfer dough to oiled bowl and let rise for 2 hours.

Prepare cinnamon swirl topping by mixing sugar and cinnamon in small bowl.

Roll dough into a rectangle, about 10 x 12 inches. Sprinkle with half of cinnamon sugar mixture. Roll up tightly, pinch ends and transfer to greased 9 x 5 loaf pan, seam side down.

Let rise an additional 2 hours. (Loaf will not rise above pan)

Preheat oven to 350 degrees.

Bake loaf for 20 minutes. Rotate pan 180 degrees and bake an additional 20 minutes or until the center of the loaf reaches 190 degrees.

Immediately brush loaf with butter and sprinkle remaining cinnamon sugar over loaf. (Tip: Do this over a pan to catch extra butter/cinnamon sugar.)

Tuesday, April 2, 2013

Easter Wrapup + Candy Studded Brownies

I used to love winter. The thrill of snow days was always so exciting. But not so much anymore. I don't know if it's because I'm older and can't stand the cold or the thrill of it all has died down. Regardless, I can't wait for warmer days. Spring has been a tease so far, but North Carolina got a little peek of it for Easter weekend. I tried to put aside my school work for a couple of days and just soak up the rays and bake, bake, bake.

The baking started with a brownie by Doron Petersan topped with Easter candies, idea courtesy of The Domestic Rebel. Although my candy choices weren't exactly vegan, the toppings could easily be replaced with your choice of candies.


Next on the list, Sweet Dough for Easter morning breakfast nests. I used hard boiled eggs, but to veganize, the dough could be shaped in nests and baked. After baking, a plastic egg could be inserted in the center. Glaze with lemon zest icing.


Serve the nests on a bed of grass with jelly beans, if desired.


Now on to the grand finale, cupcakes. I'll give you a sneak peak now, but next week they will be the featured post. What kind do you think they are?


Now back to the brownies, from the beginning of the post. These are extra special with chocolate chips studded throughout and baked with coffee concentrate. These would be a great way to use up any extra easter candy.


What have you been making? What's your favorite season?


Candy Studded Brownies Adapted from Doron Petersan and The Domestic Rebel

Ingredients

  • 1/4 cup coffee concentrate + 1/3 + 1/8 cup water (Tip: Measure concentrate in measuring cup. Then pour water on top to 2/3 cup mark) OR use 2/3 cup brewed coffee
  • 1 tbsp Earth Balance buttery stick
  • 2 ounces chocolate chips 

  • 2   3/4 cup plus 1 tbsp sugar
  • 1 cup cocoa powder
  • 1   1/2 tsp salt

  • 2/3 cup canola oil
  • 2/3 cup water
  • 1 tbsp vanilla

  • 2 cups plus 3 tbsp all purpose flour
  • 1 tsp baking powder
  • 3/4 cup chocolate chips

  • Candy

Instructions

Preheat oven to 350 degrees.

In a microwave safe bowl, melt butter and chocolate chips with coffee in microwave at 60 percent power in 1 minute intervals until completely melted.

In a large bowl, combine sugar, cocoa powder and salt. Add oil, water and vanilla and combine.

In a large measuring cup, mix flour and baking powder. Add chocolate chips. Pour into wet ingredients and mix until combined.

Pour batter into one large 9 by 13 inch baking pan or two smaller pans - Recommended: 8 x 8 inch square pan and 7 by 11 inch baking pan.

Bake brownies for 40 minutes. Add candies.Bake for an additional 5 minutes or until toothpick inserted in the center comes out clean. If using marshmallows, the candy will puff up and will lightly brown.

Follow my blog with Bloglovin

Monday, March 25, 2013

Jelly Bean Cookies


Instagram - you fooled me.

You made me think my pictures were special.

You made me think my pictures were foodgawker worthy.

You made me think one filter could turn an iPhone shot into a masterpiece.

But it's not true.

I'm not a photographer. I'm not a Photoshop pro. And your app can't make me one. But it can inspire me.

Seeing all the beautiful food blogs out there has inspired me to create my own beautiful pictures. As this blog has progressed, I have been trying to improve my photo skills. This is the first post where I really spent a lot of time food styling and using Photoshop to improve my pictures. It's a work in progress, but I like how it's going.


I introduce you to Jelly Bean cookies. I tried these last Easter and I was in love. To be honest, I haven't been able to stop thinking about them.


They are fruity and buttery (with no butter of course!) I'm pretty sure I'd rather have these any day over chocolate chip cookies. Don't get me started on my love for fruity gummy snacks. These can be made two ways either soft (bake 10 minutes) or crispy (bake 12 minutes.) I prefer soft, but make one batch of each so you can decide for yourself.


Jelly Bean Cookies Adapted from In Katrina's Kitchen

Ingredients

  • 1 cup Earth Balance Shortening, softened
  • 3/4 cup sugar
  • 3/4 cup brown sugar
  • 1 tsp vanilla

  • 1/2 cup unsweetened applesauce

  • 2    1/2 cups all purpose flour
  • 1 tsp baking soda
  • 1 tsp salt

  • 1 cup jelly beans

Instructions

Preheat oven to 350 degrees.

Beat softened shortening with sugars and vanilla.

Add applesauce a 1/4 cup at a time, until combined.

Combine dry ingredients (flour, baking soda and salt) in measuring cup.

Slowly add dry ingredients to wet.

Fold in jelly beans.

Divide into 24 equal pieces. Roll into balls and flatten slightly.

Bake 10 minutes for a soft cookie or 12 minutes for a crispy cookie. Cookie will puff up and will firm up while cooling. Let cool on baking sheets for 10 minutes (if making soft) or 5 minutes (if making crispy.) Transfer to a wire rack.

Nutrition Facts

Calories:                        210
Total Fat:                         8 g
Saturated Fat:              2 g
Cholesterol:                     0 mg
Sodium:                            155 mg
Potassium:                        42 mg
Total Carbohydrate:       35 g
Fiber:                                   0 g
Sugars:                               23 g
Protein:                              1 g


Monday, March 18, 2013

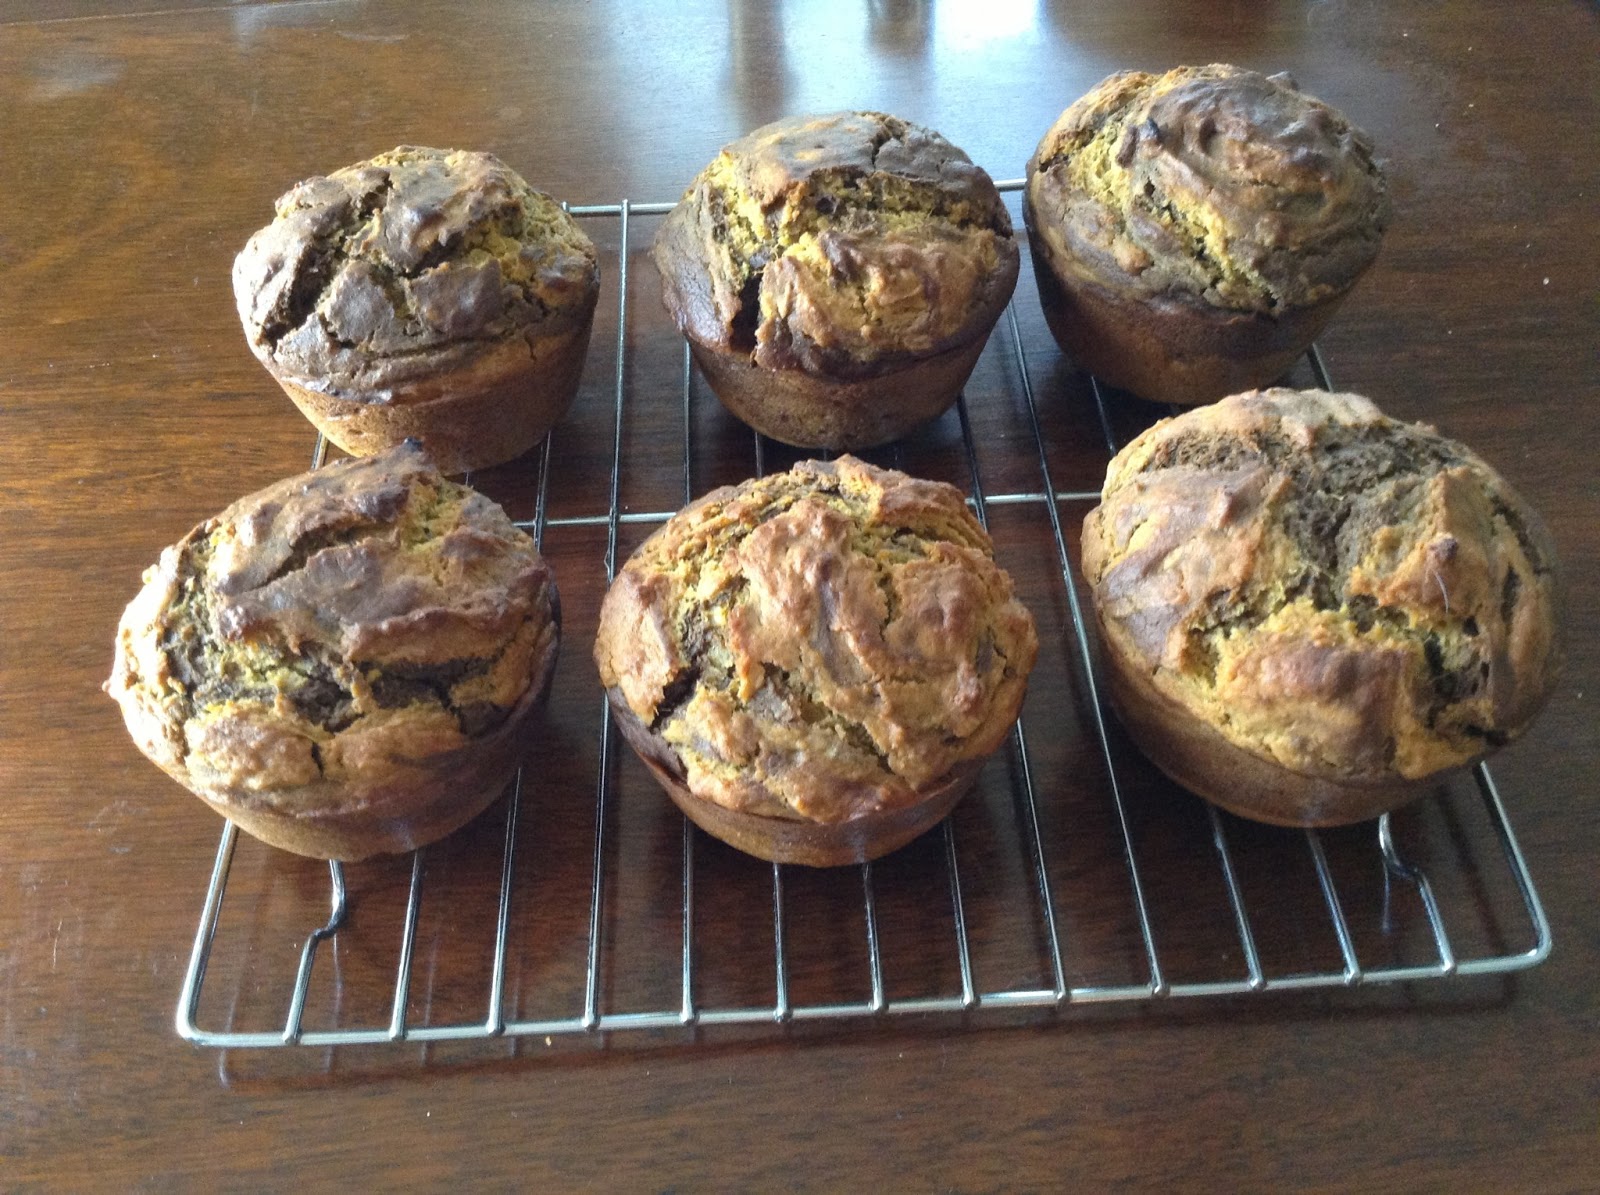
Muffin Madness: Jumbo Sweet Potato Swirl Muffins

The NCAA Tournament is fast approaching and that can mean only one thing, muffins! While filling out your bracket, munch on one of these sweet potato swirl muffins.


When I was a senior in high school my math class filled out brackets. Somehow or another my bracket was #1. It hasn't happened since, so I can only assume I had a muffin when picking out my bracket.


Now a word on the inspiration for the muffins. Minimalist Baker had a great post on Sweet Potato Almond Butter Muffins. She talked about trying peanut butter on a sweet potato. Now sweet potatoes are my favorite food and I've tried them lots of different ways, but never with peanut butter. That night I tried it and I was amazed. So, I had to come up with my own Sweet Potato muffin recipe.


The result was a coconut milk batter, thanks to Hell Yeah It's Vegan!, and a chocolate swirl, thanks to Isa Chandra Moskowitz. See the below video for how to swirl the sweet potato and chocolate peanut butter batters.


Hope you enjoy them as much as I do and good luck filling out your brackets!


Jumbo Sweet Potato Swirl Muffins Adapted from Hell Yeah It's Vegan!, Isa Chandra Moskowitz and Minimalist Baker

Makes 8 jumbo muffins

Ingredients

  • 1   1/2 cups mashed roasted sweet potato
  • 3/4 cup coconut milk
  • 2/3 cup brown sugar (Make your own with Slow Club Cookery's recipe)
  • 1/3 cup water
  • 1/4 cup canola oil
  • 2 tbsp maple syrup
  • Juice of 1 lemon

  • 2 cups all purpose flour
  • 2 tsp baking powder
  • 1 tsp baking soda
  • 1/2 tsp salt
  • 1/2 tsp cinnamon
  • 1/4 tsp ginger
  • 1/8 tsp nutmeg

  • 3 tbsp boiling water
  • 1   1/2 tbsp cocoa powder
  • 1   1/2 tbsp peanut butter

Instructions

Preheat oven to 400 degrees. 

Mix liquid ingredients from first column in large bowl.

Mix dry ingredients from second column in measuring cup. 

Pour dry ingredients into wet and combine.

Measure out one cup of batter and transfer to medium bowl. 

In a small bowl, combine boiling water, cocoa powder and peanut butter to make a paste.

Pour paste into medium bowl with reserved sweet potato batter. Combine.

Grease a jumbo muffin tin. Alternate sweet potato and chocolate peanut butter batters. Once muffin tin is full, use a toothpick to gently swirl the two batters together.

Bake for 26 minutes or until a toothpick inserted in the center comes out clean. Transfer to a wire rack to cool.

Nutrition Facts

Calories                                    330 calories
Total Fat                                     9 g
Saturated Fat                            1 g
Cholesterol                                  0 mg
Sodium                                      464 mg
Potassium                                 363 mg
Total Carbohydrate                64 g
Fiber                                            3 g
Sugars                                         32 g
Protein                                         5g


Friday, March 15, 2013

Leprechaun Cake

Leprechauns. Mischievous small men playing tricks on boys and girls. I wasn't expecting to come across any in the kitchen, but I was in for a surprise. It seemed like a normal baking day. I whipped up chocolate cake batter and mint oreo frosting with ease, however, I knew someone was messing with me when I started assembling the cake.


As I peeled the parchment paper from the cake, I could tell something was wrong. The cake felt too fragile. I hoped it was just my imagination as I slid my knife in to cut the cake in half. But it wasn't. The cake began to crumble and my big hopes for a delicious St. Patrick's Day treat were vanishing.

Perfect batter
Perfect mint oreo frosting
Then it occurred to me. The leprechauns must have turned the oven temperature down or tricked the cake into bouncing back to the touch when really it wasn't ready. I surely couldn't have done something wrong.

Winnie looking for leprechauns
Well, whatever happened, I almost had another breakdown like with the Cinnamon Cream Sandwich Cookies. Instead I decided to trudge ahead and hope for the best. I assembled the cake carefully transporting the broken pieces of cake, pouring melted chocolate over the cake and topping it with crumbled oreos. The result was one of the best cakes I've ever had. Thanks leprechauns! Your trickery can't stop me from making a great cake.


Chocolate Cake Adapted from Sticky Fingers' Sweets

Ingredients

  • 2   2/3 cup all purpose flour
  • 1/2 cup whole wheat flour
  • 1   2/3 cup sugar
  • 1/2 cup cocoa powder
  • 1 tsp salt
  • 1 tbsp baking powder

  • 1   3/4 cup water
  • 2/3 cup canola oil
  • 1 tbsp vanilla extract
  • 1/2 tsp mint extract

  • 2 tbsp apple cider vinegar

Instructions

Preheat oven to 350 degrees.

Mix all dry ingredients from first column in large bowl. 

Whisk all liquid ingredients from second column in medium sized bowl.

Pour liquid ingredients into dry ingredients and mix.

Once thoroughly combined, add apple cider vinegar. Mix until you see parts of the batter change color. It does not need to be completely combined.

Pour into a 10 x 15 inch pan lined with parchment paper. 

Bake for 20 minutes or until the cake bounces back to the touch.

Mint Oreo Frosting Adapted from Sticky Fingers' Sweets

Ingredients

  • 6 tbsp Earth Balance shortening
  • 2 tbsp Earth Balance buttery spread

  • 1    1/3 cup powdered sugar

  • 1 tsp vanilla extract
  • 1/4 tsp mint extract
  • 1 tbsp almond milk
  • 5 drops green food coloring

  • 5 crushed cool mint oreos 

Instructions

Beat shortening and butter with a hand mixer until combined.

Add powdered sugar 1/3 cup at a time.

Add liquid ingredients from third column.

Beat until fluffy, about three minutes.

Fold in crushed oreos.

Cake Assembly

Ingredients

  • 1 chocolate cake
  • 1 batch mint oreo frosting
  • 1 cup chocolate chips
  • 5 crushed Cool Mint Oreos

Instructions

Cut cake in half.

Spread one half with mint oreo frosting.

Top with unfrosted cake half.

Melt chocolate chips and pour over cake.

Sprinkle with crushed oreos.